Mobile application test automation with Appium. Without coding.
Testing mobile application is painful.
First, you need to find a way to run the mobile application, in a local or remote device, most of the time emulated.
Then, you have to integrate Appium with your existing testing scripts, solving librairies conflits to get an helloworld running.
Once your tests are ready, deploying in CI/CD or for monitoring brings a new of difficulties to tackle until things work together.
It would have been best if all this integration time was used for implementing more valuable mobile tests and collaborate with the team.
That’s where using Cerberus Testing, the open-source test automation platform can saves you time and accelerate your results.
This guide will help you understand the test automation workflow and good practices to implement mobile test for Android and iOS:
- Step 1 — Setup of Testing Environments
- Step 2 — Create the Test Case
- Step 3 — Run & Report the Test Case
Follow Cerberus Testing for more open-source test automation.
Step 1 — Setup of Application, Robot & Environments
This section describes the initial setup and integration to enable the mobile test automation:
- Upload the mobile application on the device
- Configure the robot to interact with the device
- Define the testing environments of the application.
1.1. Upload Your Mobile Application
Your mobile application first have to be available on the device before launching any test.
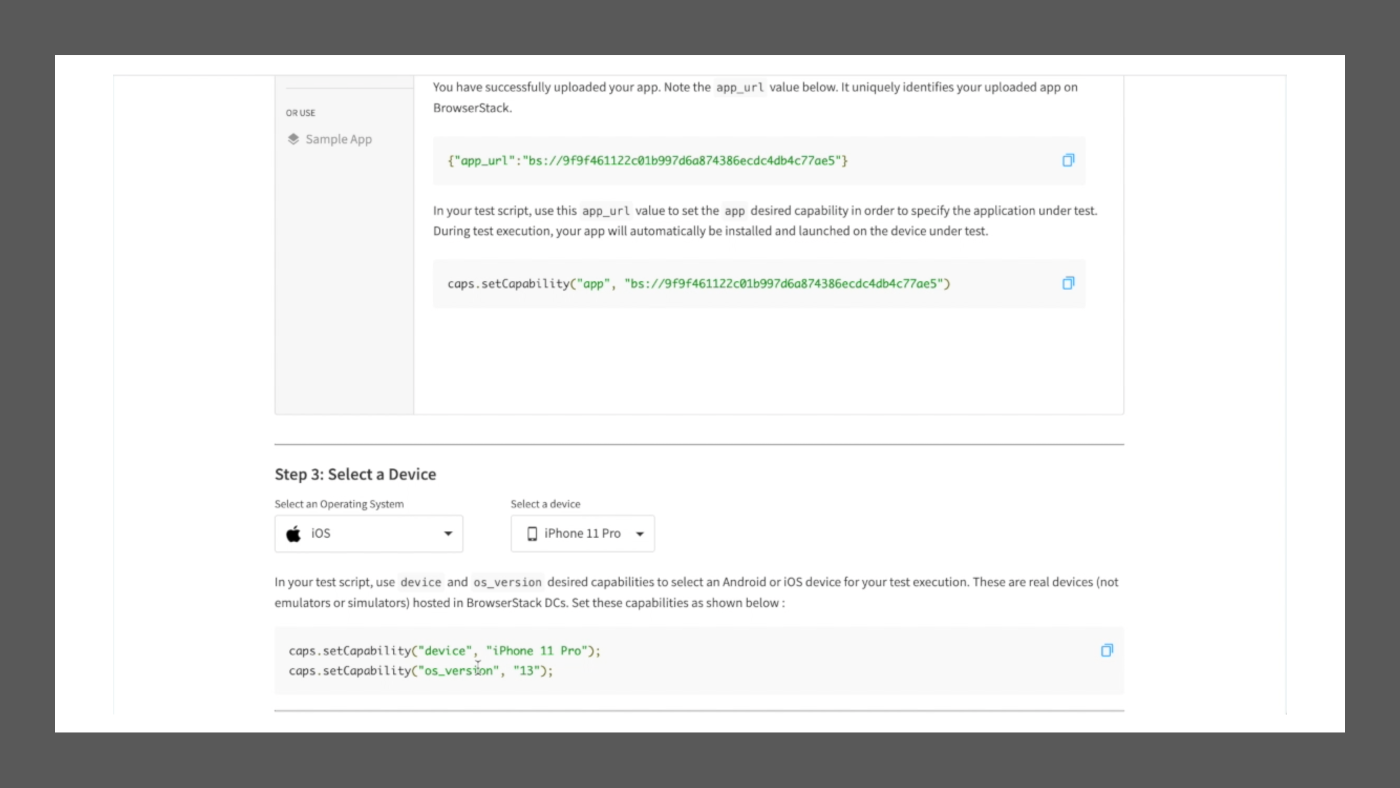
In our case, we use a remote device with Browserstack App Automate (a step-by-step configuration tutorial is available here).
After the successful upload, you will reach the screen below to define the various capabilities required.
1.2. Create The Testing Robot
The next step is to configure the Test Robot inside Cerberus Testing, making the bridge between your tests and the device to test.
Navigate to the “Run > Robot” menu to create the robot:
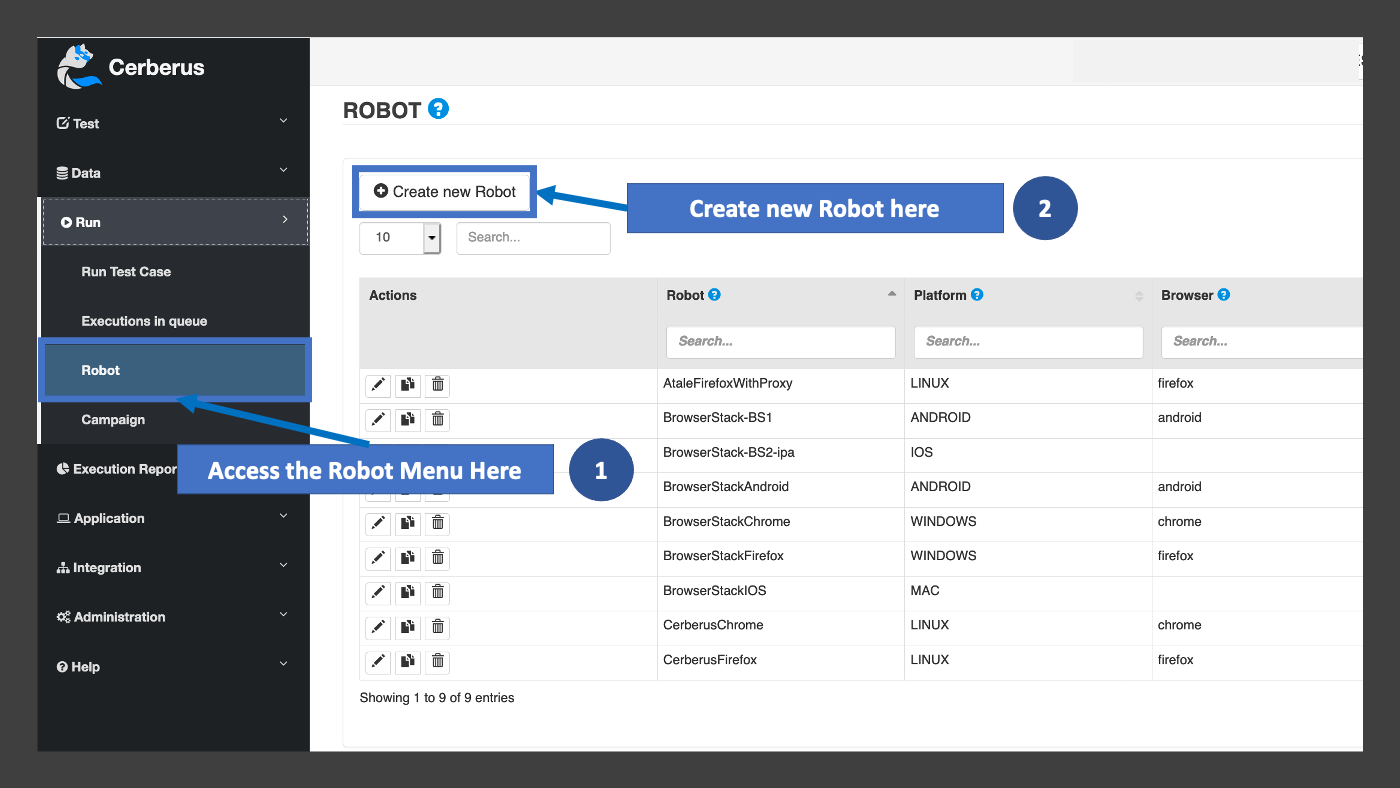
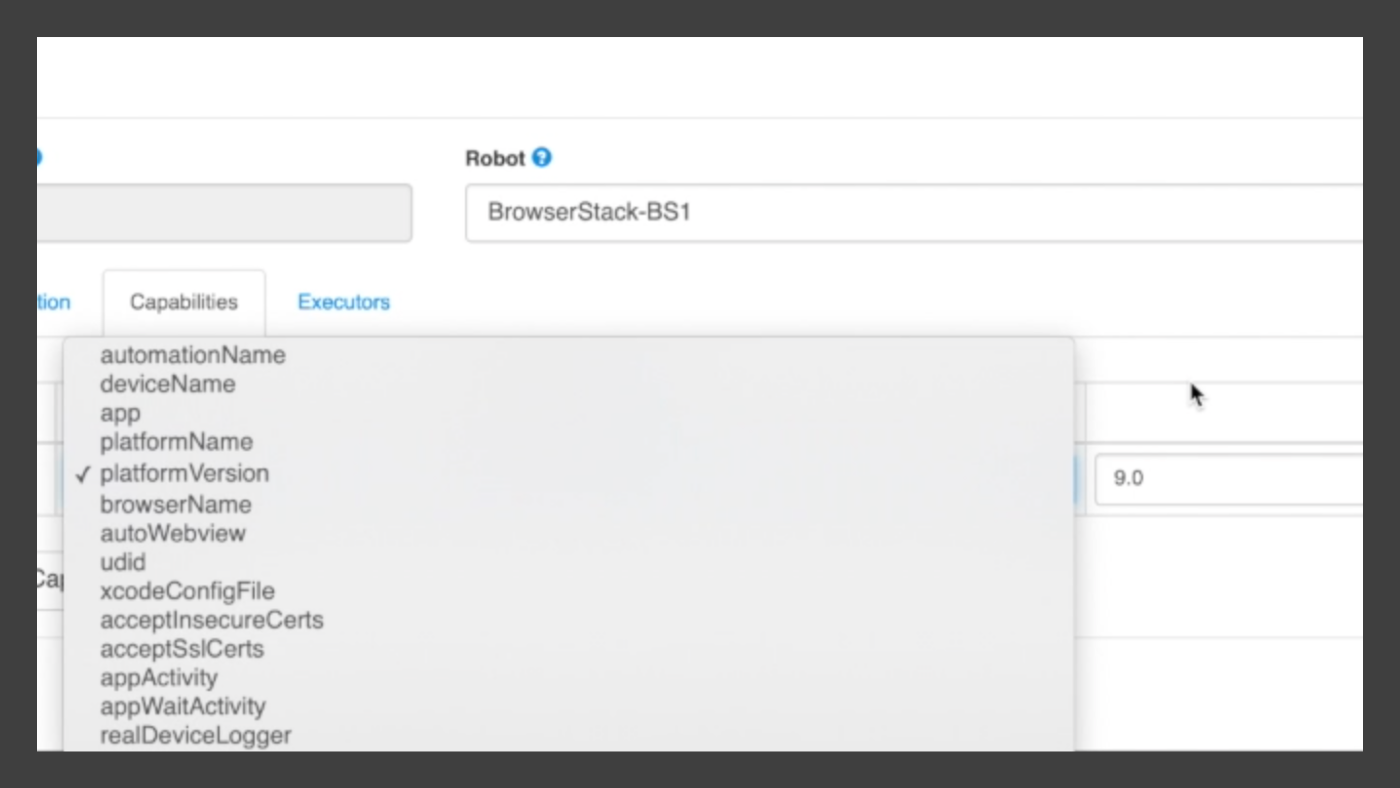
Here, the following pop-up will appear with the necessary information to describe your robot :
- Type: Choose either IPA for iOS devices, or APK for an Android one.
- Platform: Choose the correct one depending on your first option.
You can then add the required capabilities from the previous step.
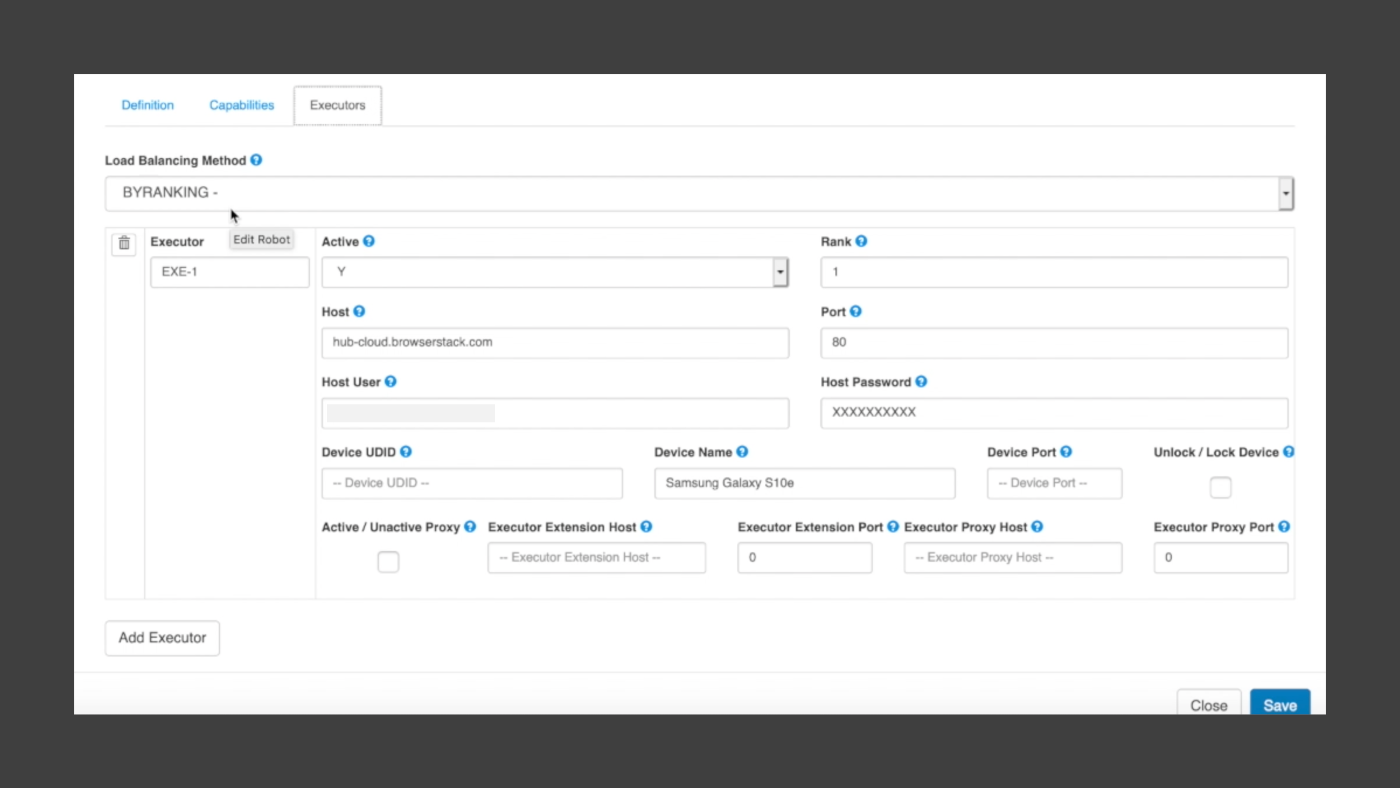
And finally configure the testing hub integration parameters, double-checking the host, device and password.
1.3. Create The Application
Finally, the last step is to create the application under test.
This enable you to create test on a particular tests, and also reuse the same application definition across various tests, simplifying their maintenance.
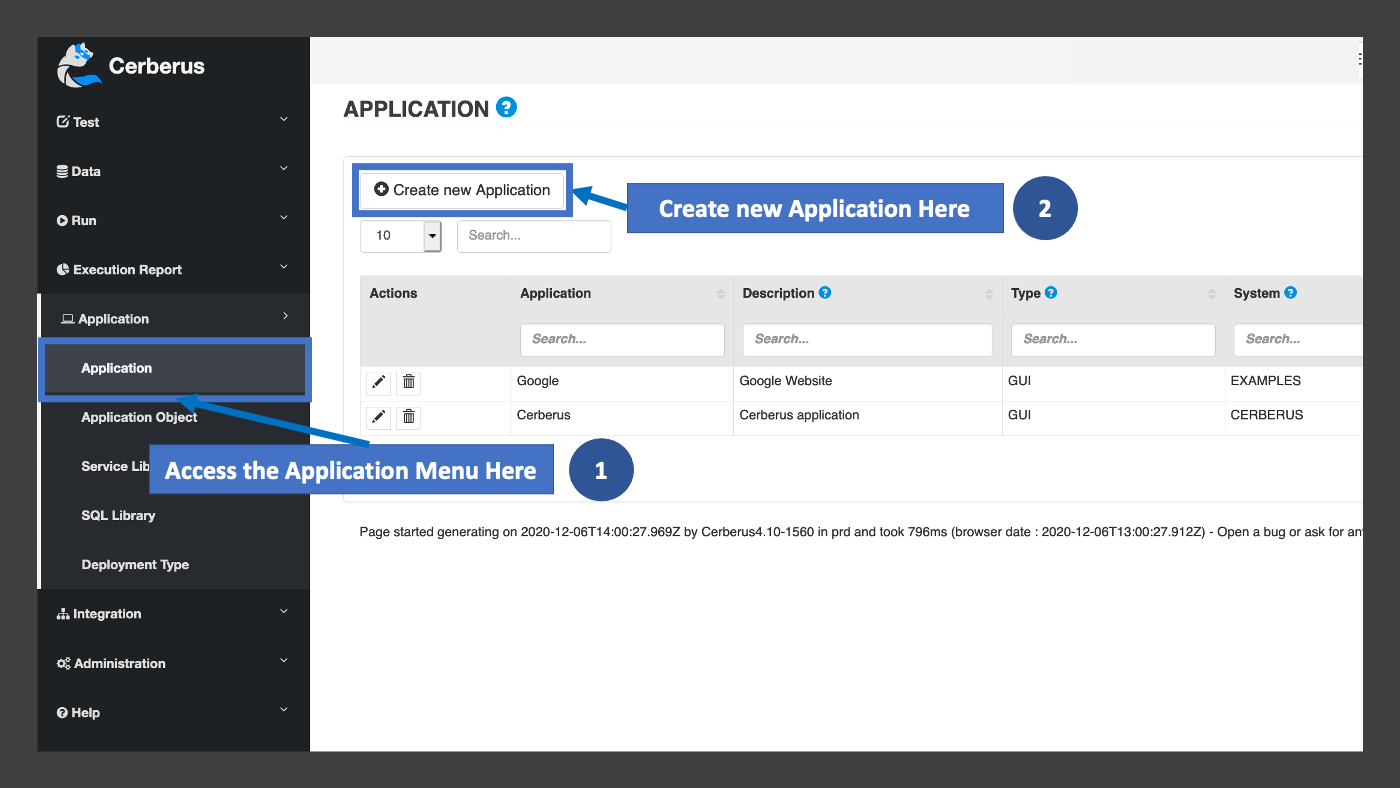
It involves defining the application name, description, typology and available environments in the “Application >Application” menu.
The following pop-up will appear with the necessary information to describe your application :
- Type: Select the same mobile application typology as previously.
- System: Select to which system this application belongs to.

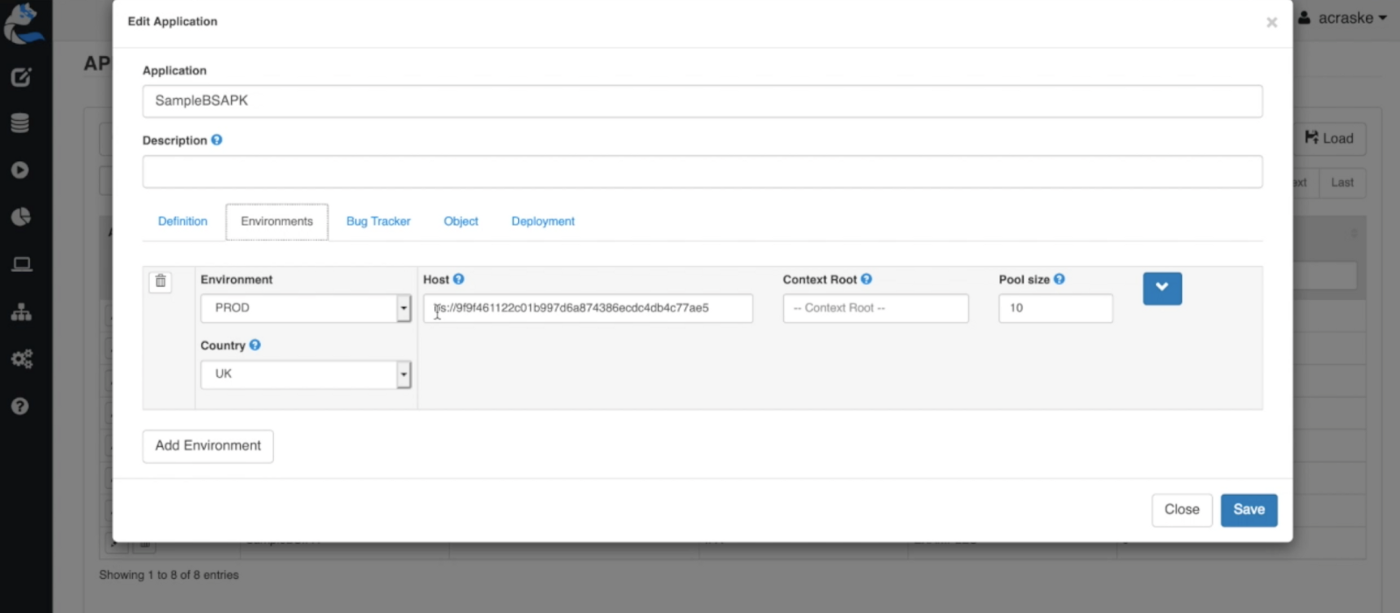
You can now move to the tab “Environments” where we will configure the test context.
Namely, the test environment (QA, UAT), country and host. The host must contain the id of your device under test. The format is “bs:<id>” in our case.
You can configure as many environments as you desire, combining the test environments or countries parameters. They must represent different test contexts you can opt for your test execution.
Step 2 — Create The Test Case
You will now build our test case to be run against the application we just created.
2.1. Create the Test Case Header
Access to the test case menu on “Test > TestCase List”:
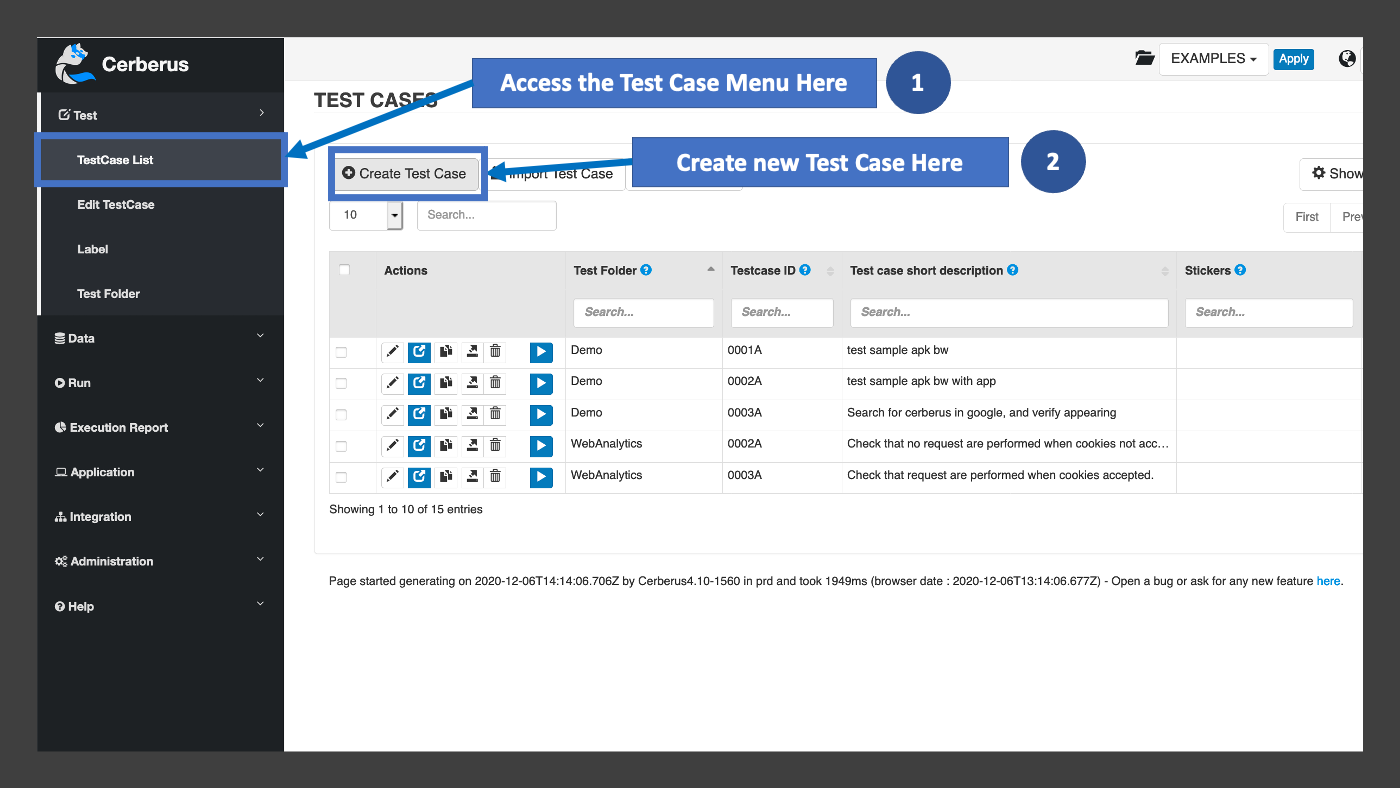
Click on “Create Test Case” to display the creation pop-up, that we will fill with the required information :
- Test Folder: Select in which folder you want to keep your test cases. Here choose “Demo”. The folders can be managed in the “Test / Test Folder” page.
- Testcase ID: Enter your custom ID or leave the default generated one.
- Test case short description : Enter one-line description, usually in a use-case format “As a <user>, I want to do <use-case> and verify <controls>”
- Application: Select the application under test, in our case “SampleBSAPK”
Other types such as as status, priority as straightforward to fill in.

The other tabs are not necessary for now.
Note: if you are creating your own test and want to run it in the “PROD” test environment — you will need to activate this in the tab “Execution Settings” by checking the corresponding box.
Clicking on “Create”, you will confirm the test case creation.
f you accept the default test case creation, a default Step will be created. In our case, we will follow a brand new creation process.
2.2. Define The Step, Action and Control
You can now configure the test case content using the low code library: Step, Action and Control.
A Step contains the Action and Control for the main stages of your test, similarly to the BDD format on “given, when, then”.
With a good design of those elements, you will be able to reuse them across tests to improve your test maintainability.

You can now add a Step via the “Add Step” button and enter the corresponding description.
Then, you can fill in the actions and controls of the automated tests.
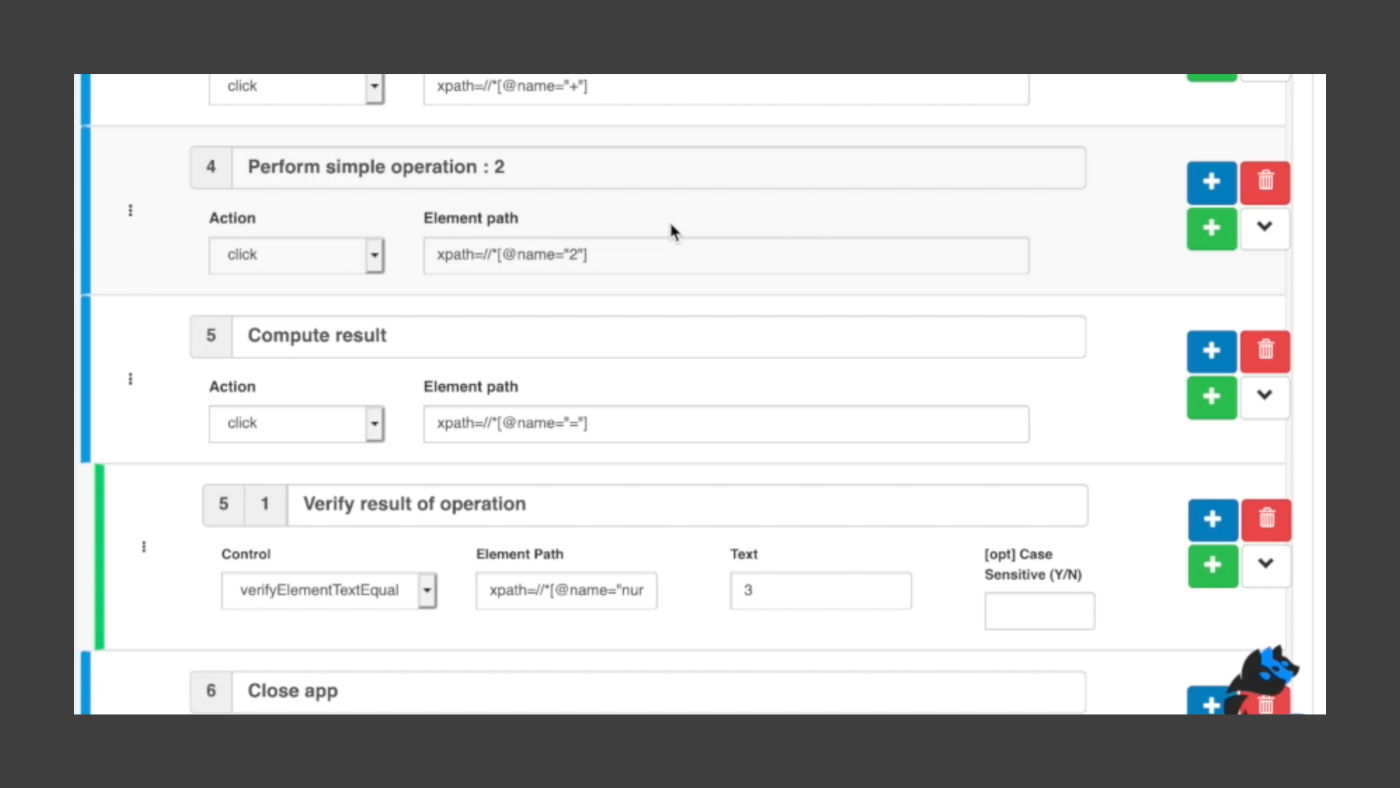
We listed below the parameters that you can use:
1- Open the mobile application
- Action openApplication: Open the application set in the Application definition.
2- Take a screenshot after application opening
- Control takescreenshot: Will take a full screen screenshot (defined it for the sake of demonstration as they can be taken automatically if needed).
3- Perform various compute operations
- Action click: Click on the recognized element.
- Element path xpath=//input[@name=’btnK’]
4- Verify the search results
- Control verifyElementTextEqual: In this case, we will verify if the result of our operation is as expected in the result area. A lot of other controls are available and described in the documentation.
5- Close the mobile application
- Action closeApplication: Close the application to end the session with the robot acting as the interface between your test and the device.
- This will avoid the test to remain pending and liberate the session.

We confirm the changes by clicking on the “Save Test Case” button in the top right corner.
Step 3 — Run & Report The Test Case
You can now execute your test case and access the native reporting available.
3.1. Launch the Test via the Run Test Page
Navigate to the Run page by going to “Run > Run Test Case”, to then select your test.
Scroll down to reach that screen.
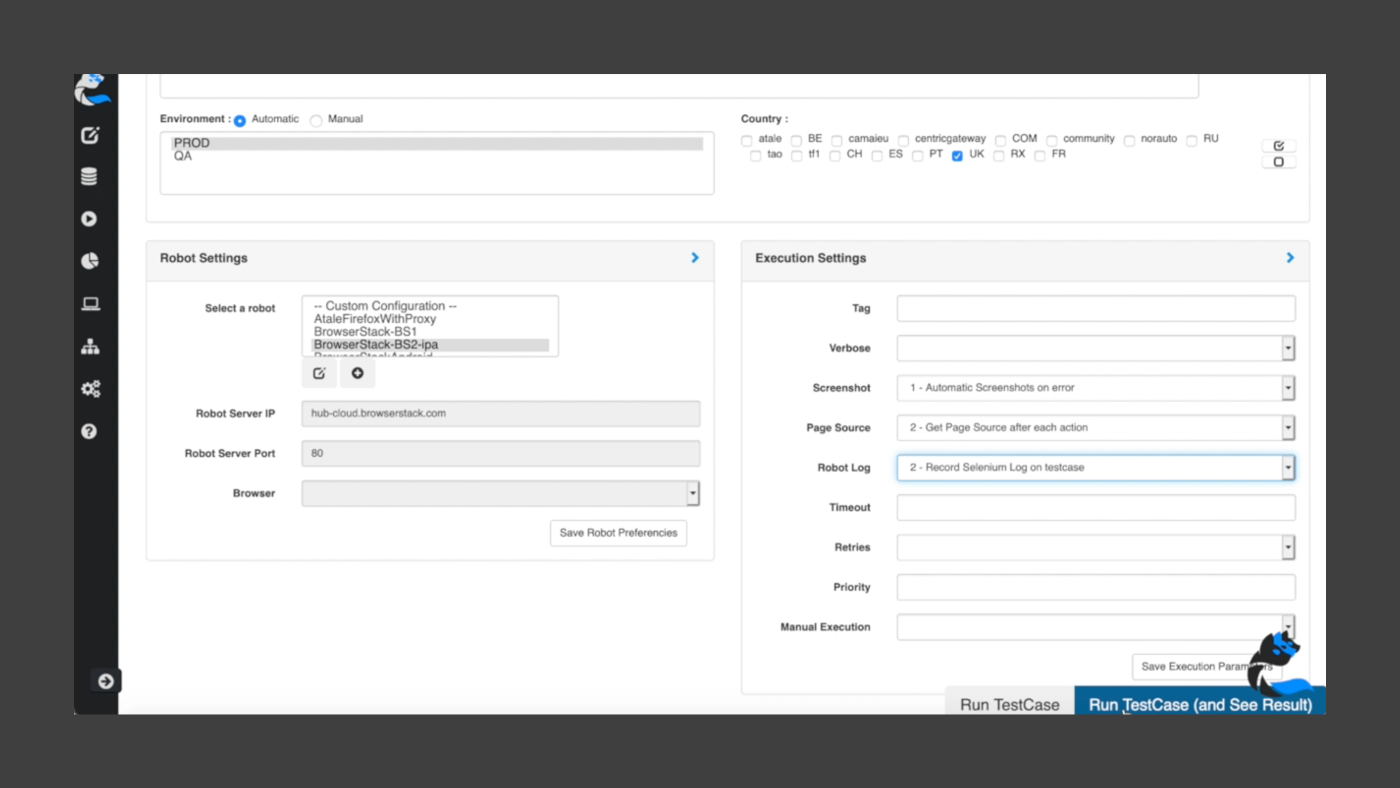
Next, confirm the following parameters :
- Environment: Select one or more environments where the Test Case should be executed. In our case, pick “QA”or “PROD”.
- Country: Check one or more countries where you would like to run the Test Case. Pick “UK”.
- Robot Settings: Define the mobile app hub where the Test Case will be executed upon. In addition, you can integrate with other remote testing farms such as LambdaTest, Kobiton, Saucelabs among others.
- Execution Settings: Mainly related to the traceability levels for the test, test infrastructure and queuing mechanisms (retry, priority, …).
Launch the Test Case and see it running live by clicking on “Run TestCase (and See Result)”.
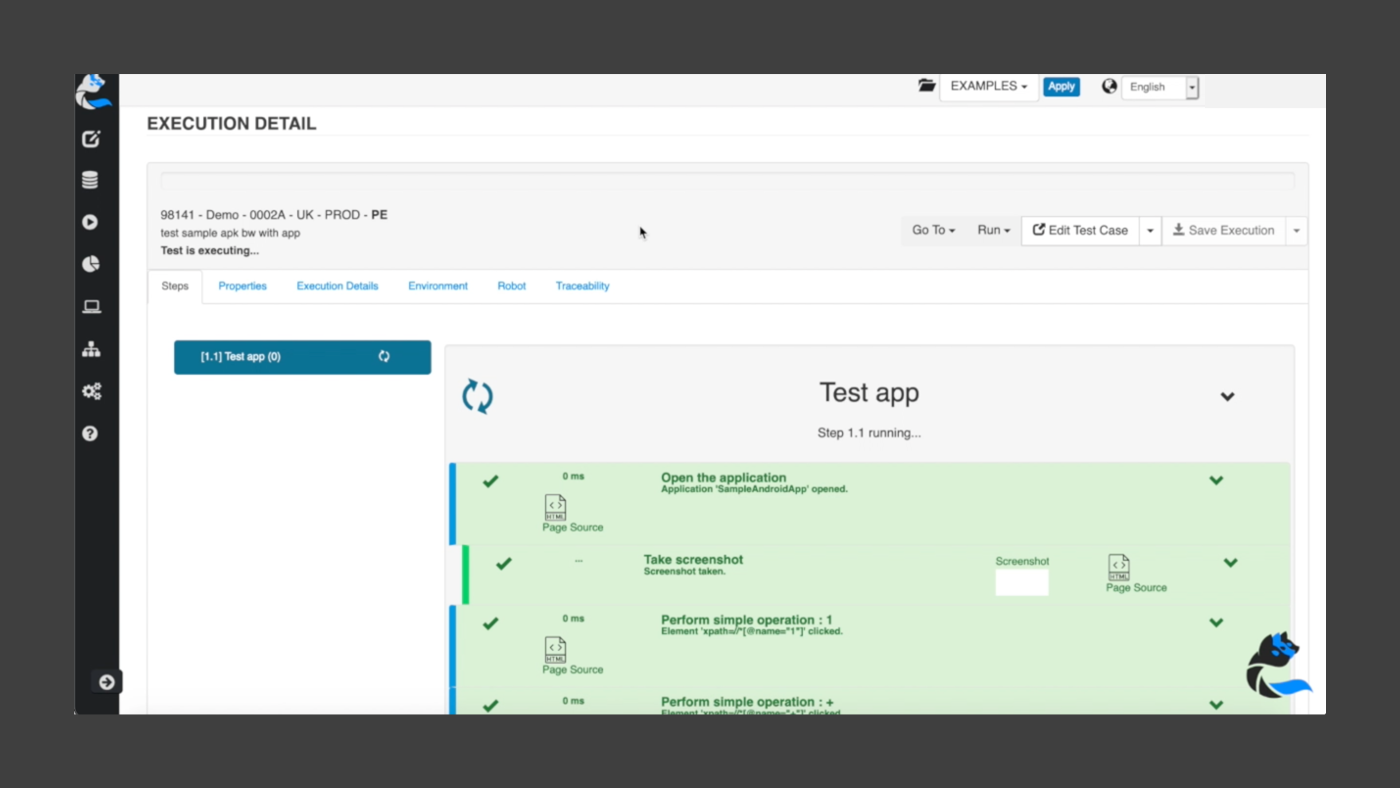
3.2. Follow the Test Case Execution
You will see this page appearing after the test launch, displaying the live execution results.
3.3. Analyze The Test Case Report
It is now time to analyze the result of our Test Case execution.
Once your Test Case is finished, the progress bar on the top will display your Test Status.
The main ones are OK or KO, you can access more detailed information in the Cerberus Testing Documentation on Execution Status.
Troubleshooting guidelines
If you encounter an issue during the process, please check the following points:
- Verify your Application definition, especially for the test environment and country. If you encounter a message related to those parameters this is probably the problem.
- Verify your Test Case activated Environment. If you cannot launch your test in a Production environment you will need to explicitly activate it in the Test Case Header.
- Verify your Robot is correctly running and accessible on the ports you configured. You can manage them on the “Run/Robots” page.
Accelerating Your Mobile Testing Automation
By now you should have been able to run the example we described or even a test case of yours.
You can now expand your mobile test automation leveraging the reusable step libraries, native reporting and even analytics.
Scaling your test automation will be supported by the other capabilities offered by Cerberus Testing.
You can for example easily parallelize your tests across various browsers adding a robot in your existing definition.
Stop coding, start testing today.